> ## Documentation Index
> Fetch the complete documentation index at: https://tutorials.spellslate.com/llms.txt
> Use this file to discover all available pages before exploring further.
# Builder and coverage
# Builder and coverage
> **Who can do this:** Free plan on your first project, Supporter on all projects. Adding and editing shots needs project edit access; members with view access get the read-only list view instead.
The Builder is where the shot list gets made, whether that's weeks out in prep or the night before you shoot: script on the left, shots on the right, and an entry row built to keep up with you and your DP calling out shots.
Find it under **Visual** → **Builder**.
## Open a scene
1. Click a scene in the left sidebar. Scene parts appear as badges under their scene.
2. The scene's script loads in the center and its shots load in the right panel.
The **Lists** tab in the sidebar shows schedule days and custom lists instead of script order.
 ## Add a shot with the entry row
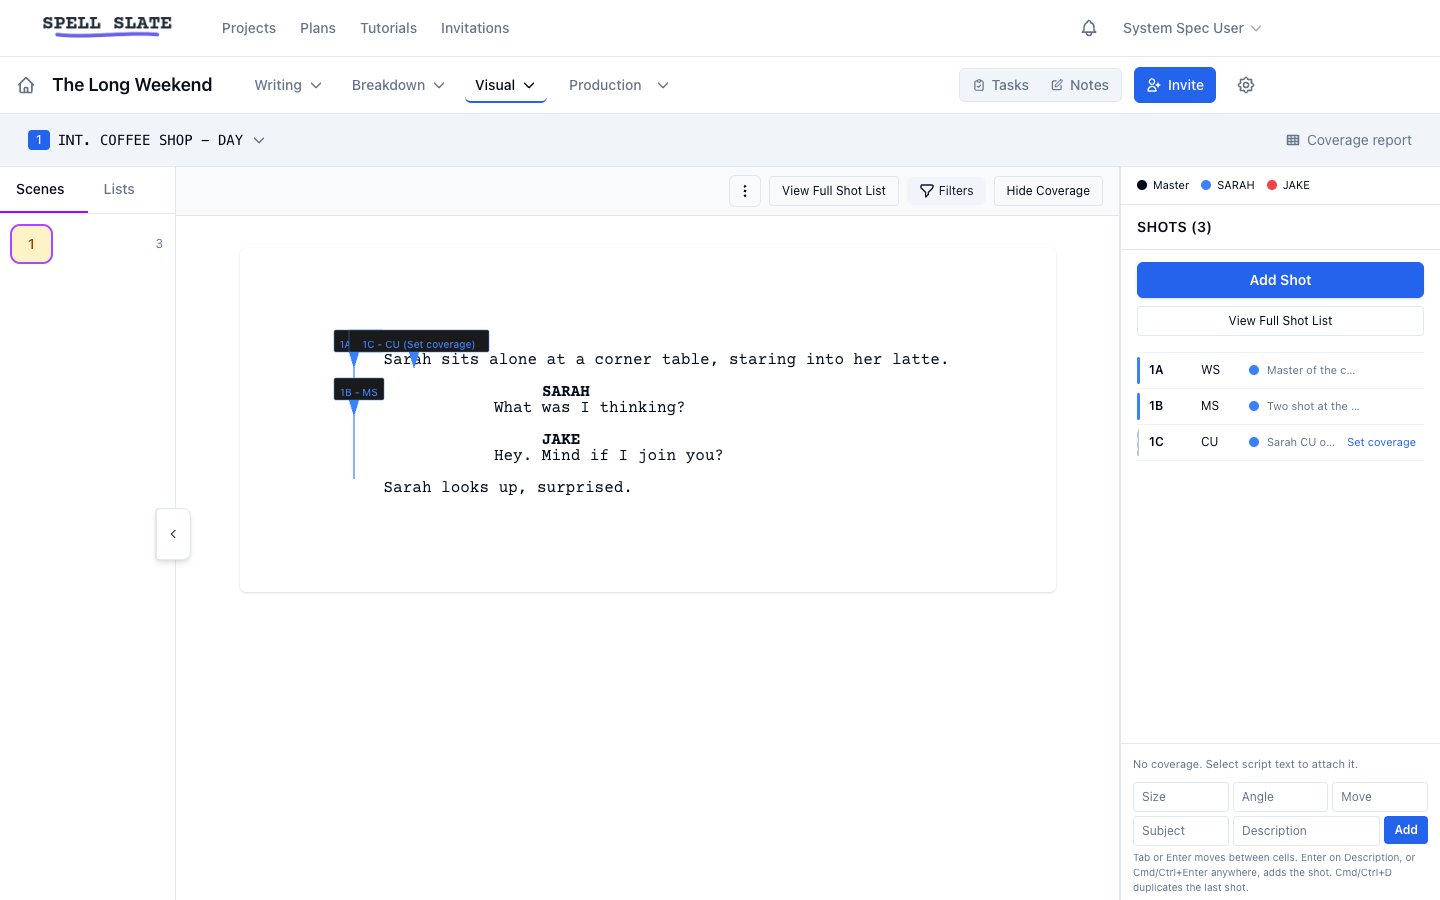
The entry row sits under the shot list and is always ready for the next shot.
1. Type in the **Size** cell. The cell suggests as you type, and spreadsheet shorthand works: `ws`, `cu`, `ots`, and `master` all resolve (master becomes WS). On manual shot numbering, an **Identifier** cell comes first; type the shot's number or letter there.
2. Press **Enter** or **Tab** to confirm the suggestion and move to the next cell.
3. Fill **Angle**, **Move**, and **Subject** the same way, or skip past any of them.
4. Type a **Description**, then press **Enter** to add the shot.
Pressing **Cmd+Enter** (Mac) or **Ctrl+Enter** (Windows) adds the shot from any cell. Enter anywhere else only moves between cells, so a reflex Enter never commits a half-filled row. **Escape** clears the cell you are in.
The shot lands in the list immediately and the row clears for the next one. The previous shot's Move and Subject stay behind as grayed suggestions; type anything to replace them, or leave them to carry into the next shot.
## Attach script coverage to a new shot
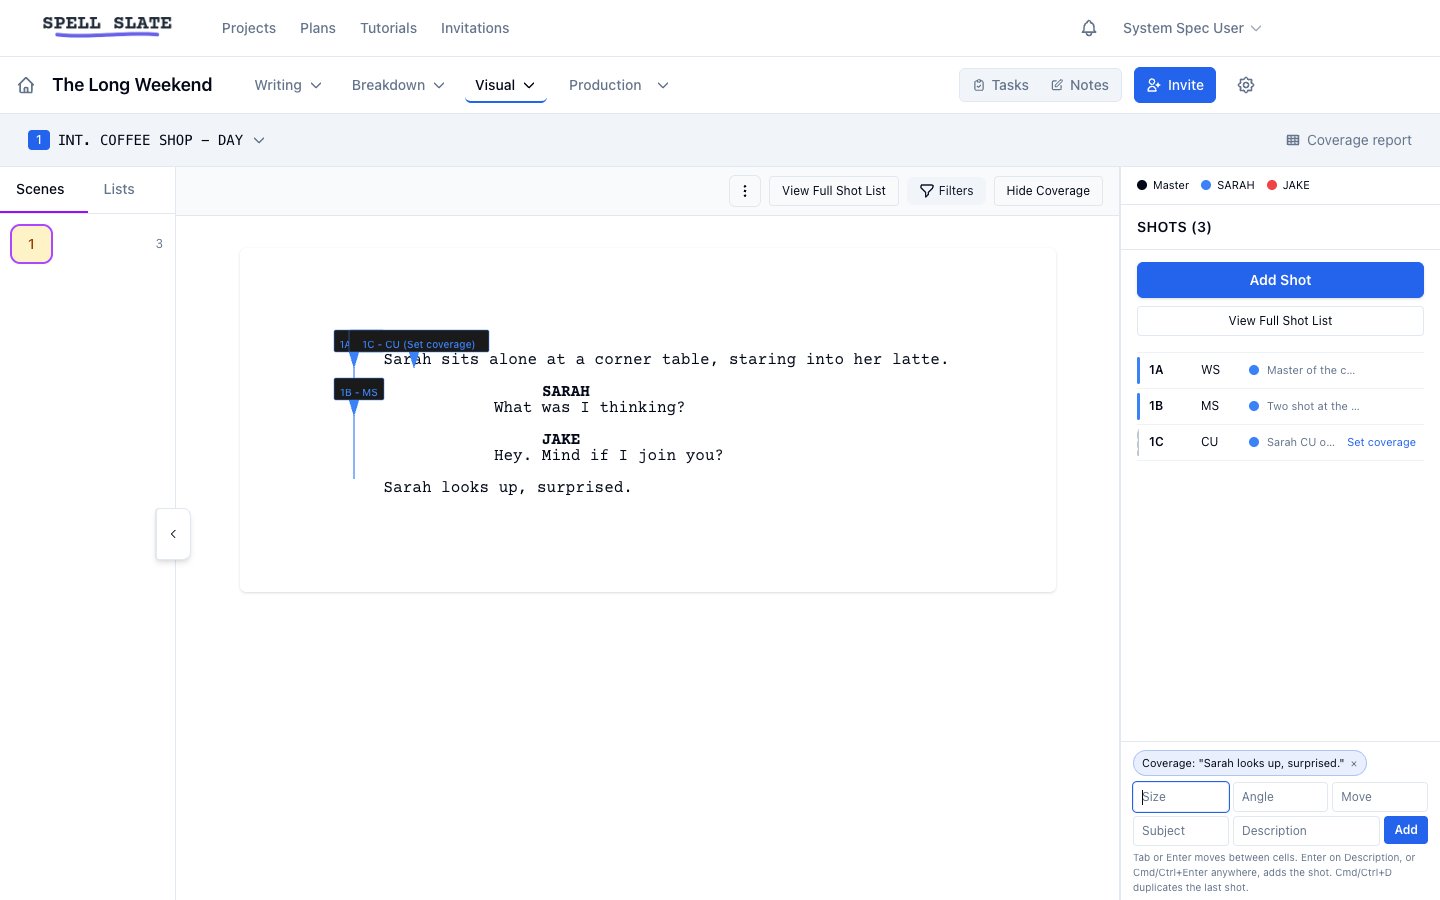
1. Select the script text the shot covers.
2. The entry row picks up the selection as a chip above the cells.
3. Fill the cells and press **Enter** on the description to add the shot.
The shot is created with its coverage line already drawn on the script. Click the **x** on the chip to detach the selection instead. When nothing is selected, the chip line reads **No coverage. Select script text to attach it.**
## Add a shot with the entry row
The entry row sits under the shot list and is always ready for the next shot.
1. Type in the **Size** cell. The cell suggests as you type, and spreadsheet shorthand works: `ws`, `cu`, `ots`, and `master` all resolve (master becomes WS). On manual shot numbering, an **Identifier** cell comes first; type the shot's number or letter there.
2. Press **Enter** or **Tab** to confirm the suggestion and move to the next cell.
3. Fill **Angle**, **Move**, and **Subject** the same way, or skip past any of them.
4. Type a **Description**, then press **Enter** to add the shot.
Pressing **Cmd+Enter** (Mac) or **Ctrl+Enter** (Windows) adds the shot from any cell. Enter anywhere else only moves between cells, so a reflex Enter never commits a half-filled row. **Escape** clears the cell you are in.
The shot lands in the list immediately and the row clears for the next one. The previous shot's Move and Subject stay behind as grayed suggestions; type anything to replace them, or leave them to carry into the next shot.
## Attach script coverage to a new shot
1. Select the script text the shot covers.
2. The entry row picks up the selection as a chip above the cells.
3. Fill the cells and press **Enter** on the description to add the shot.
The shot is created with its coverage line already drawn on the script. Click the **x** on the chip to detach the selection instead. When nothing is selected, the chip line reads **No coverage. Select script text to attach it.**
 ## Duplicate the last shot
Press **Cmd+D** (Mac) or **Ctrl+D** (Windows) with the entry row focused. The scene's last shot is copied in full, coverage included, as the next letter variant (a `3A` becomes `3B`). Focus stays in the row, so repeating the shortcut builds out variants quickly.
To duplicate any other shot, open it and use **Duplicate** in the inspector's **⋯** menu.
## Edit a shot
1. Click a shot in the right panel to open the inspector.
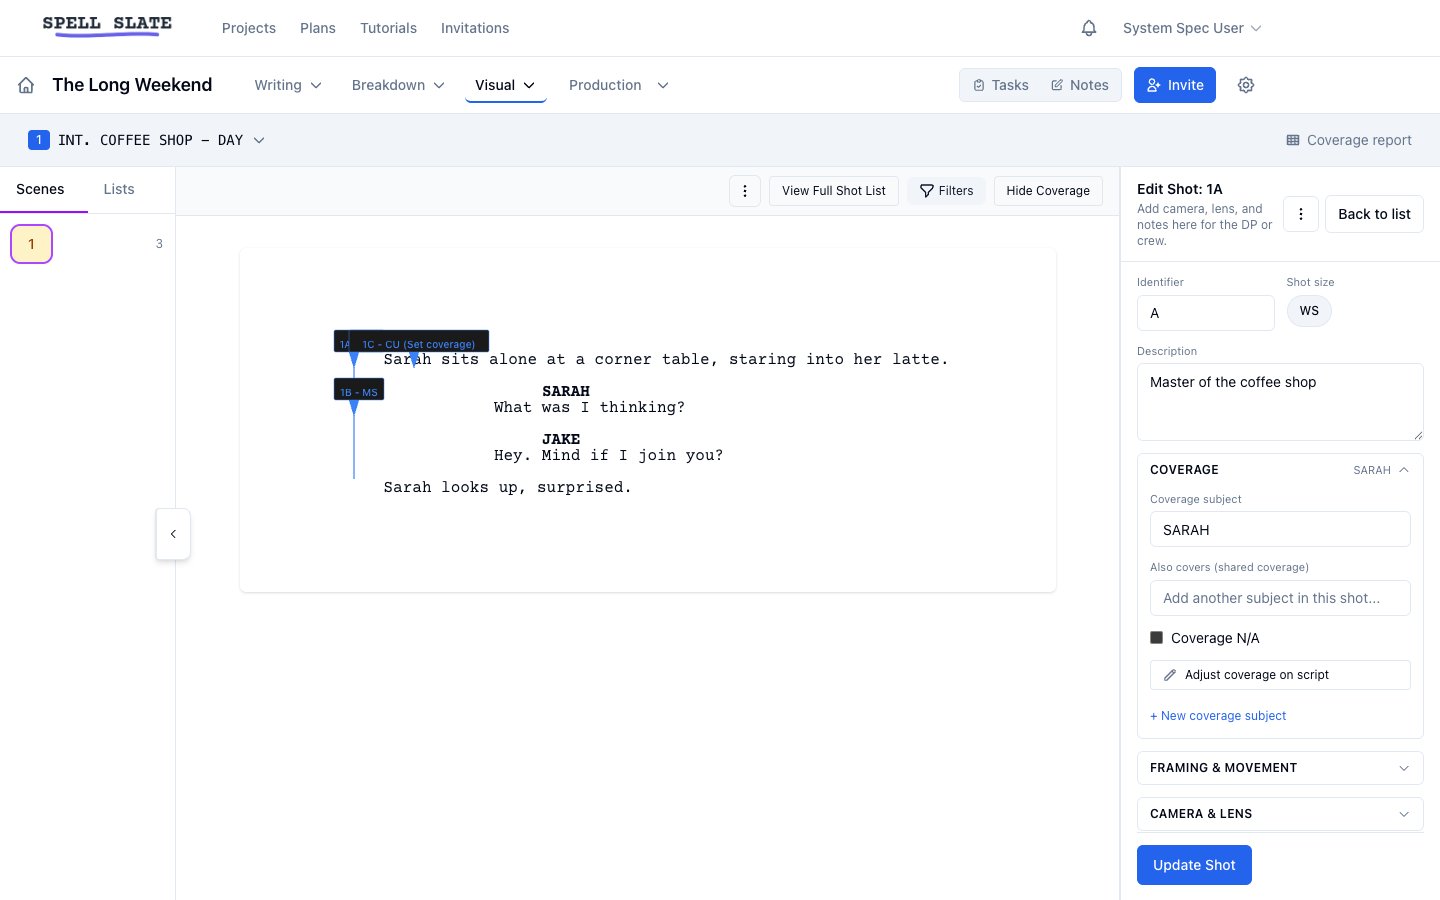
2. Edit fields inside the **Coverage**, **Framing & Movement**, **Camera & Lens**, and **Production** groups. Each group's header summarizes what is set inside it.
3. Click **Update Shot** to save, or **Back to list** to leave without saving.
The **⋯** menu in the inspector header holds **Duplicate**, **Move to scene**, and **Delete**.
## Duplicate the last shot
Press **Cmd+D** (Mac) or **Ctrl+D** (Windows) with the entry row focused. The scene's last shot is copied in full, coverage included, as the next letter variant (a `3A` becomes `3B`). Focus stays in the row, so repeating the shortcut builds out variants quickly.
To duplicate any other shot, open it and use **Duplicate** in the inspector's **⋯** menu.
## Edit a shot
1. Click a shot in the right panel to open the inspector.
2. Edit fields inside the **Coverage**, **Framing & Movement**, **Camera & Lens**, and **Production** groups. Each group's header summarizes what is set inside it.
3. Click **Update Shot** to save, or **Back to list** to leave without saving.
The **⋯** menu in the inspector header holds **Duplicate**, **Move to scene**, and **Delete**.
 ## Set or adjust a shot's coverage line
1. In the inspector's **Coverage** group, click **Mark coverage on script** (or **Adjust coverage on script** when a line exists).
2. Click in the script where coverage starts, then where it ends, or drag the handles of the existing line.
3. Click **Save coverage**.
While coverage mode is active the rest of the inspector is paused, so a stray click cannot edit two things at once.
## Credit more than one person with a shot
A two shot covers both people in it. In the inspector's **Coverage** group, the primary **Coverage** subject drives the shot's color; **Also covers (shared coverage)** adds credit for everyone else in the shot.
1. Click into **Also covers (shared coverage)** and pick a subject.
2. Each added subject appears as a chip. Click a chip's **x** to remove it.
3. Click **Update Shot**.
Checking **Coverage N/A** clears the shared credits along with the primary; a shot with no coverage applies to nobody.
## Mark a master
A shot counts as the scene's master when its purpose is **Establishing (master)** or its size is WS or EWS. In the entry row, typing `master` or `wide` in the Size cell resolves to WS.
## Read the coverage strip
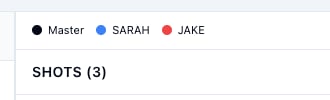
The strip above the shot list is the scene's coverage scorecard.
* The **Master** dot fills when the scene has an establishing or wide shot.
* Each subject dot fills when that person has at least one shot crediting them, primary or shared.
* Click a filled dot to show only that subject's coverage lines on the script. Click it again to restore your filters.
## Set or adjust a shot's coverage line
1. In the inspector's **Coverage** group, click **Mark coverage on script** (or **Adjust coverage on script** when a line exists).
2. Click in the script where coverage starts, then where it ends, or drag the handles of the existing line.
3. Click **Save coverage**.
While coverage mode is active the rest of the inspector is paused, so a stray click cannot edit two things at once.
## Credit more than one person with a shot
A two shot covers both people in it. In the inspector's **Coverage** group, the primary **Coverage** subject drives the shot's color; **Also covers (shared coverage)** adds credit for everyone else in the shot.
1. Click into **Also covers (shared coverage)** and pick a subject.
2. Each added subject appears as a chip. Click a chip's **x** to remove it.
3. Click **Update Shot**.
Checking **Coverage N/A** clears the shared credits along with the primary; a shot with no coverage applies to nobody.
## Mark a master
A shot counts as the scene's master when its purpose is **Establishing (master)** or its size is WS or EWS. In the entry row, typing `master` or `wide` in the Size cell resolves to WS.
## Read the coverage strip
The strip above the shot list is the scene's coverage scorecard.
* The **Master** dot fills when the scene has an establishing or wide shot.
* Each subject dot fills when that person has at least one shot crediting them, primary or shared.
* Click a filled dot to show only that subject's coverage lines on the script. Click it again to restore your filters.
 ## See coverage on the script
Turn on **Show Coverage** to draw each shot's line on the script in its subject's color. Use the **Filters** panel to limit which subjects are drawn. Gaps in a character's color are beats nobody has a shot for yet; the [coverage report](/coverage-report) answers the same question for the whole script at once.
## Related
* [Your first shot list](/first-shot-list)
* [Using shots to confirm coverage](/coverage-by-character)
* [Coverage report](/coverage-report)
* [Shot list](/shot-list)
## See coverage on the script
Turn on **Show Coverage** to draw each shot's line on the script in its subject's color. Use the **Filters** panel to limit which subjects are drawn. Gaps in a character's color are beats nobody has a shot for yet; the [coverage report](/coverage-report) answers the same question for the whole script at once.
## Related
* [Your first shot list](/first-shot-list)
* [Using shots to confirm coverage](/coverage-by-character)
* [Coverage report](/coverage-report)
* [Shot list](/shot-list)