Managing costumes

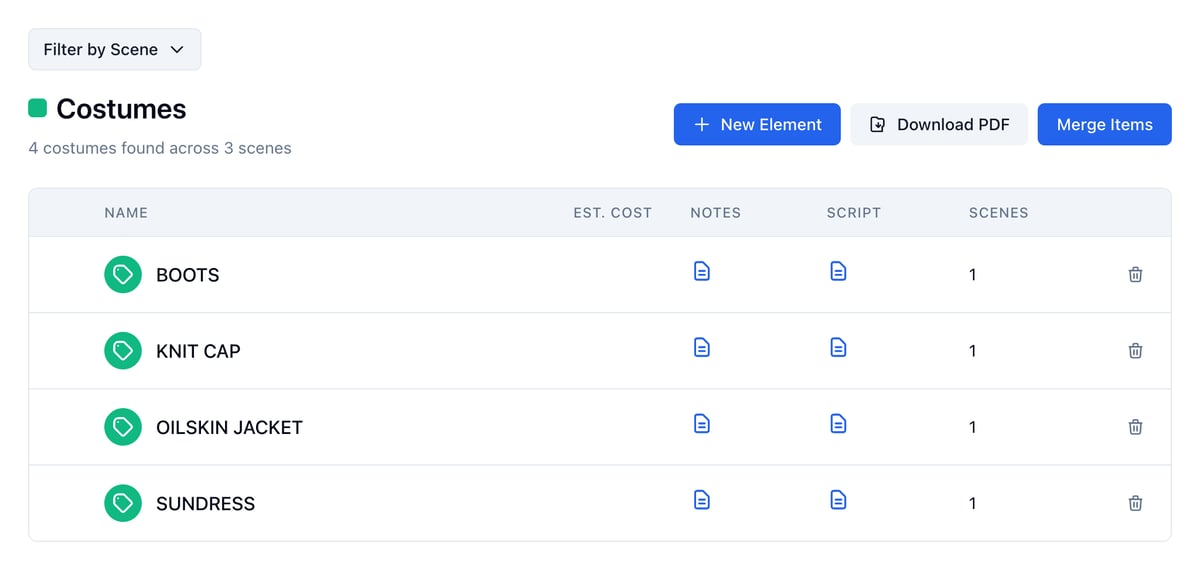
Costumes are where continuity bites: the jacket in scene 1 has to be the jacket in scene 40, shot three weeks apart. Tag each garment in the script, tie it to the character who wears it, and group garments into costume changes so you can see what everyone is wearing in every scene. In the project nav, click Breakdown, then Elements. Under Costumes, click Open hub. The Costumes list for Harbor Lights (Wardrobe): boots, knit cap, oilskin jacket, and sundress, each in one scene Each row links to the garment’s board and to its scene in the script, and shows how many scenes it appears in. Est. Cost shows what it’s expected to cost once someone costs it, for people who can see the budget.
Tag a costume from the script

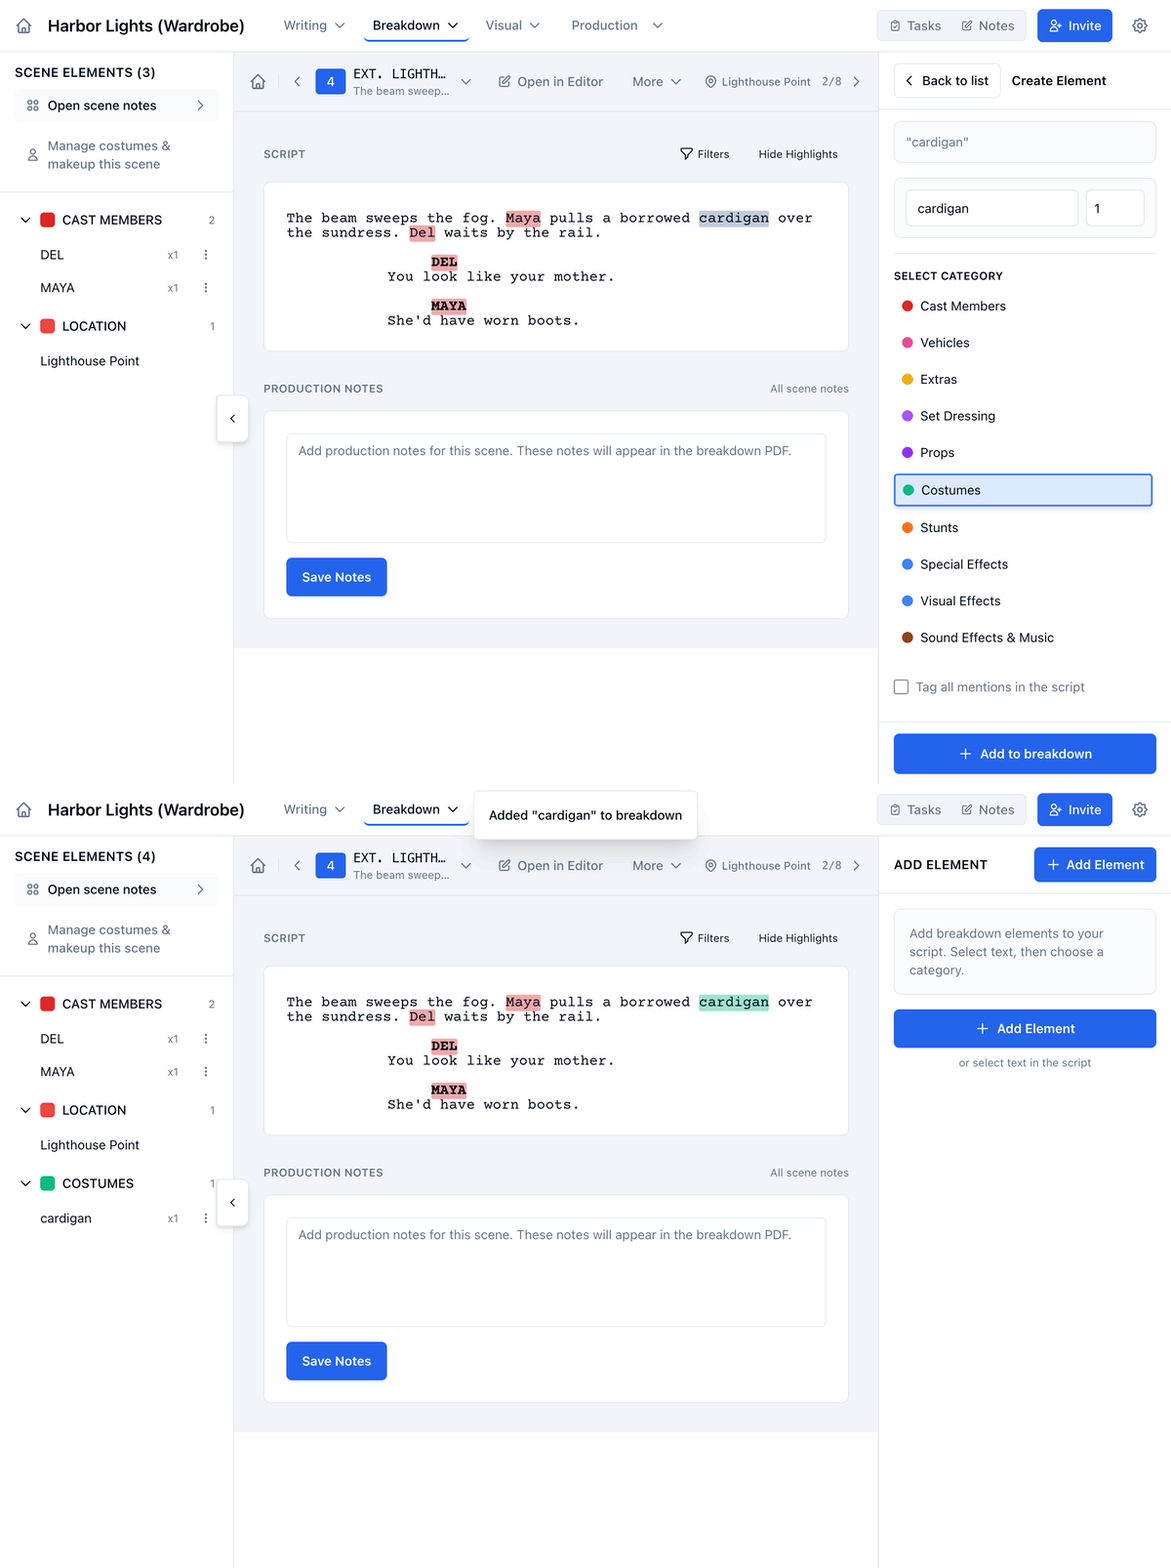
  1. Open Breakdown and click the arrow in a scene’s Breakdown column.
  2. In the script, select the words for the garment, like cardigan.
  3. In the panel on the right, under Select Category, click Costumes.
  4. Click Add to breakdown.
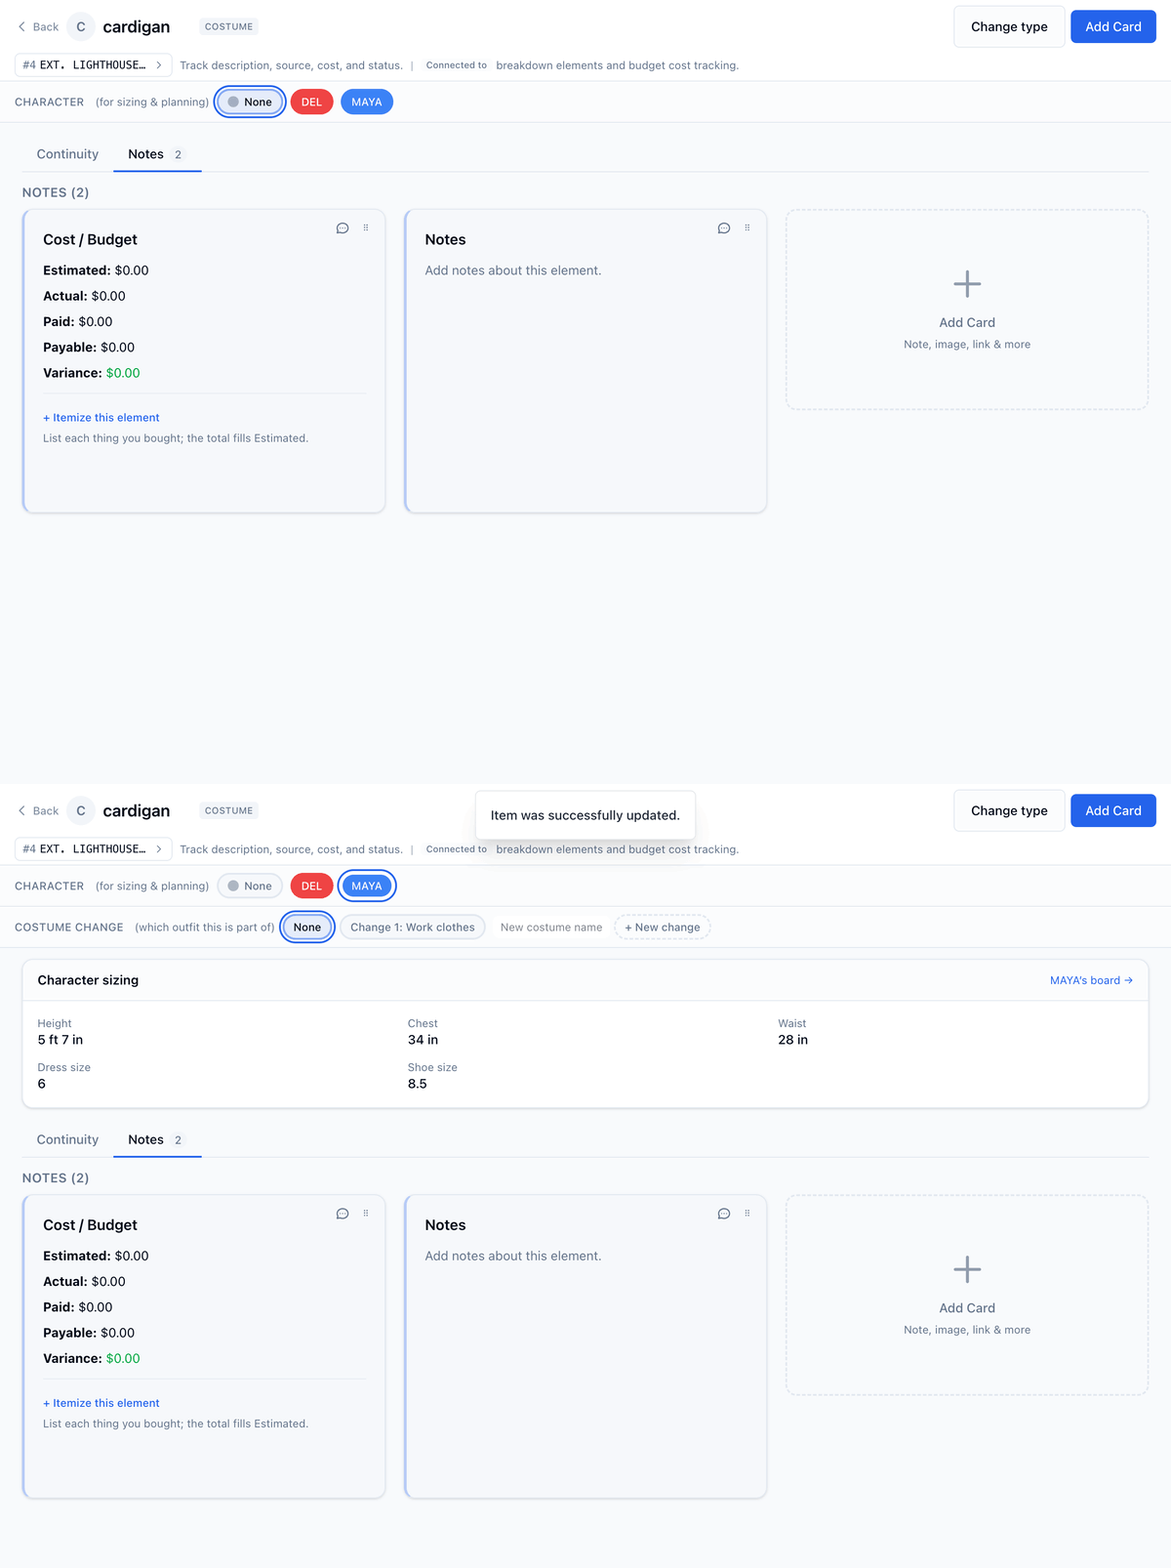
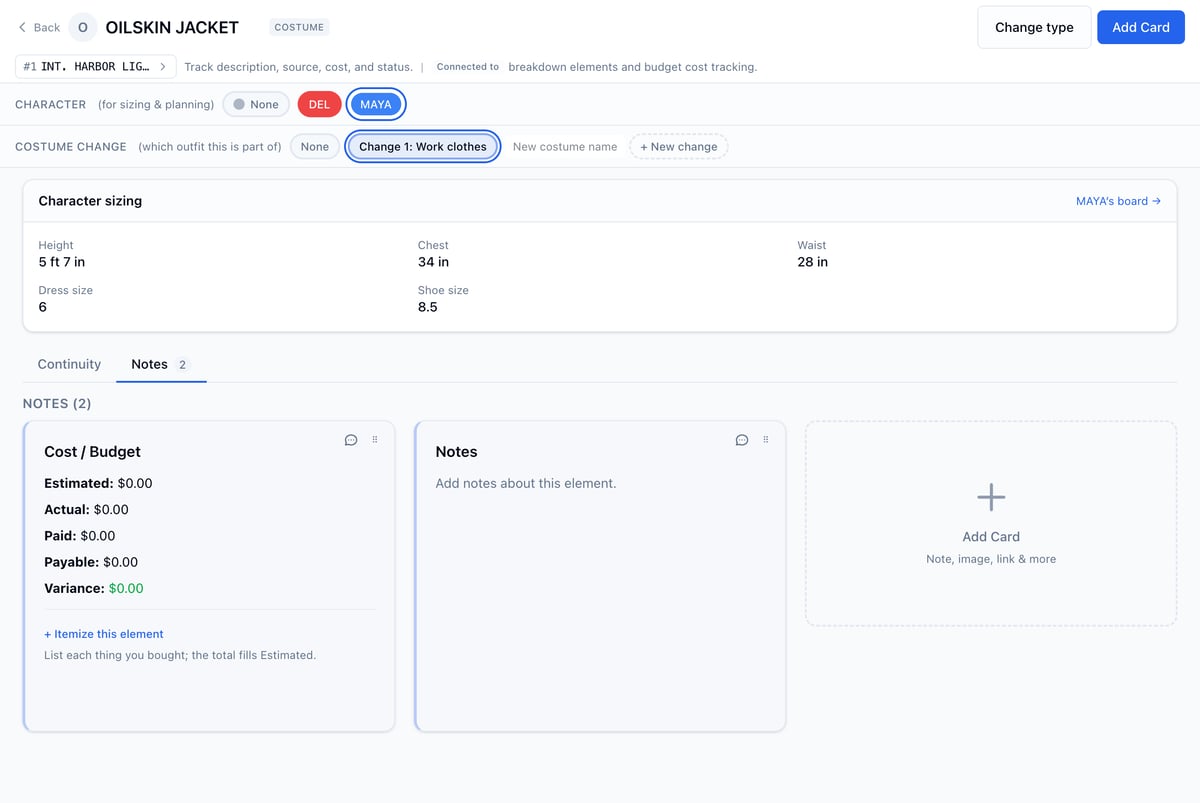
Selecting cardigan in the lighthouse scene and choosing Costumes, then cardigan listed under Costumes in the scene's elements You can also click Add Element without selecting any text and type the name yourself. See Tagging elements in a script breakdown for more on tagging. Open the garment’s board from the Costumes list. Next to Character, click the character who wears it. The characters in the garment’s scene are listed first; pick anyone else from Other character. Clicking MAYA on the cardigan's board, which brings up the Costume change row and Maya's sizes Once it’s linked, the board shows Character sizing with the actor’s measurements from the character’s board, so fittings have sizes next to the garment. The oilskin jacket's board, linked to Maya in Change 1: Work clothes, with her height, chest, waist, dress size, and shoe size Clicking a different character takes the garment out of its costume change, since the change belongs to the first character. Pick one of the new character’s changes in the Costume change row. If the sizes are empty, open the character’s board and add a Specifications card with sizes like Height, Chest, and Shoe size. A cast member’s answers to a sizes request land there too. See Managing characters.
Group garments into a costume change

A costume change is one outfit: the jacket, boots, and hat worn together. Once a garment is linked to a character, the board shows a Costume change row. To start a new change:
  1. Open the garment’s board.
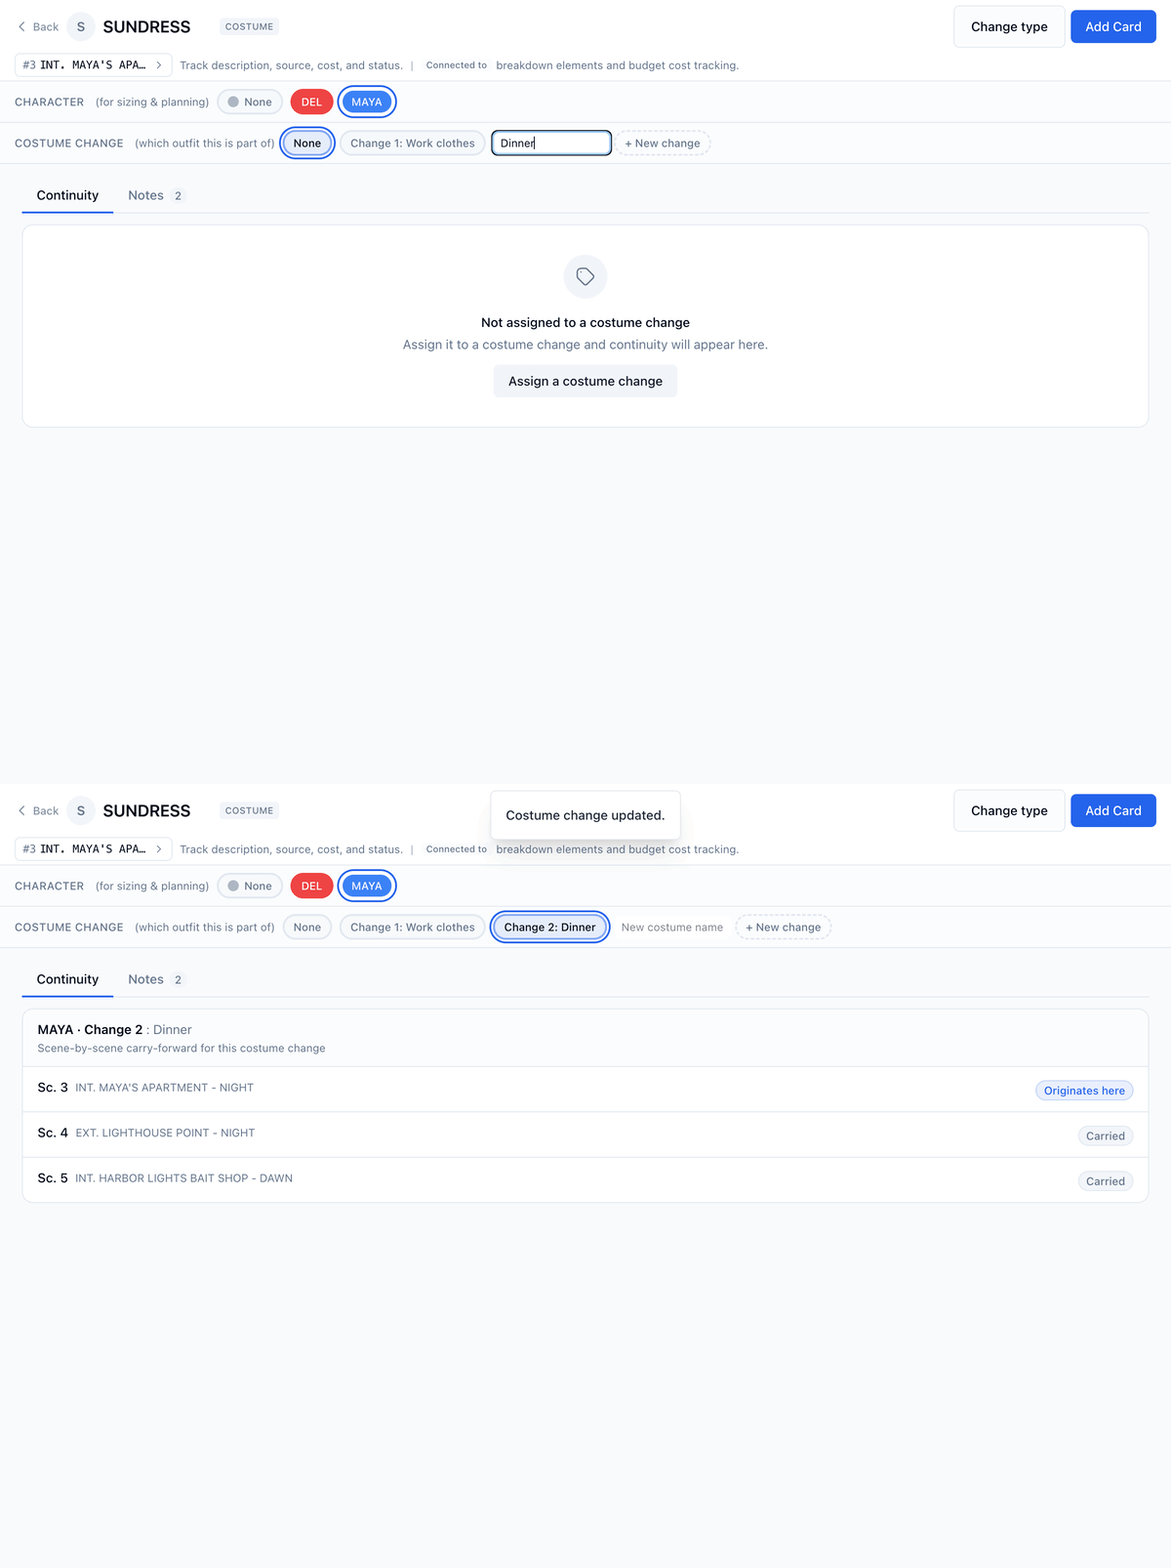
  2. Type a name in New costume name, like “Dinner”.
  3. Press Enter, or click + New change.
To add a garment to an existing change, click the change’s name in the Costume change row, like Change 1: Work clothes. Naming a new change Dinner on the sundress's board, then Change 2: Dinner selected and its continuity from Sc. 3 on Each character’s changes are numbered in the order you create them. The Continuity tab on the board lists every scene the change covers: Originates here where it starts, Carried in the scenes after it.

Delete a costume change

  1. Open any garment’s board for that character.
  2. In the Costume change row, click the × next to the change.
  3. Click OK to confirm.
Garments in it stay in the breakdown and move to None. Later changes move up a number, so Change 3 becomes Change 2.

Pick what a character wears in a scene

A change carries forward until the character’s next change. When a character goes back into an earlier costume, set it in that scene.
  1. Open the scene’s breakdown page.
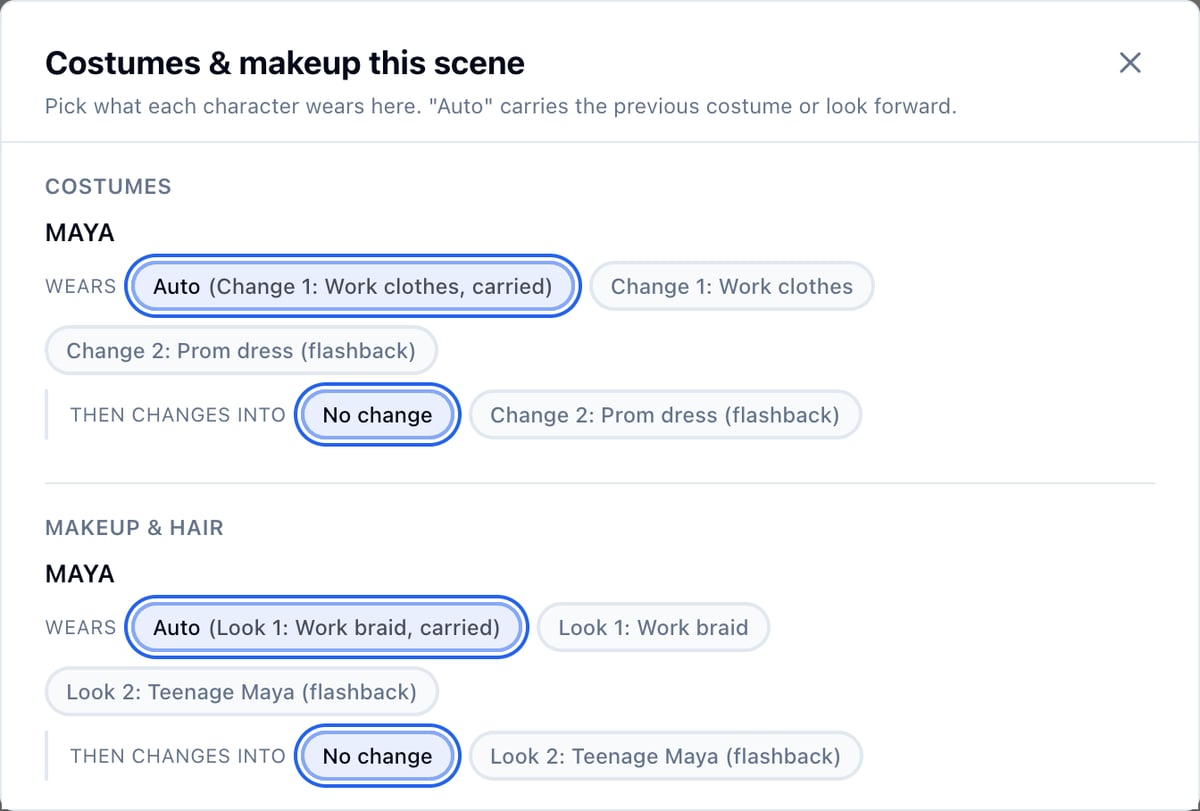
  2. In the sidebar, click Manage costumes & makeup this scene.
  3. Under the character, next to Wears, click the change they’re in.
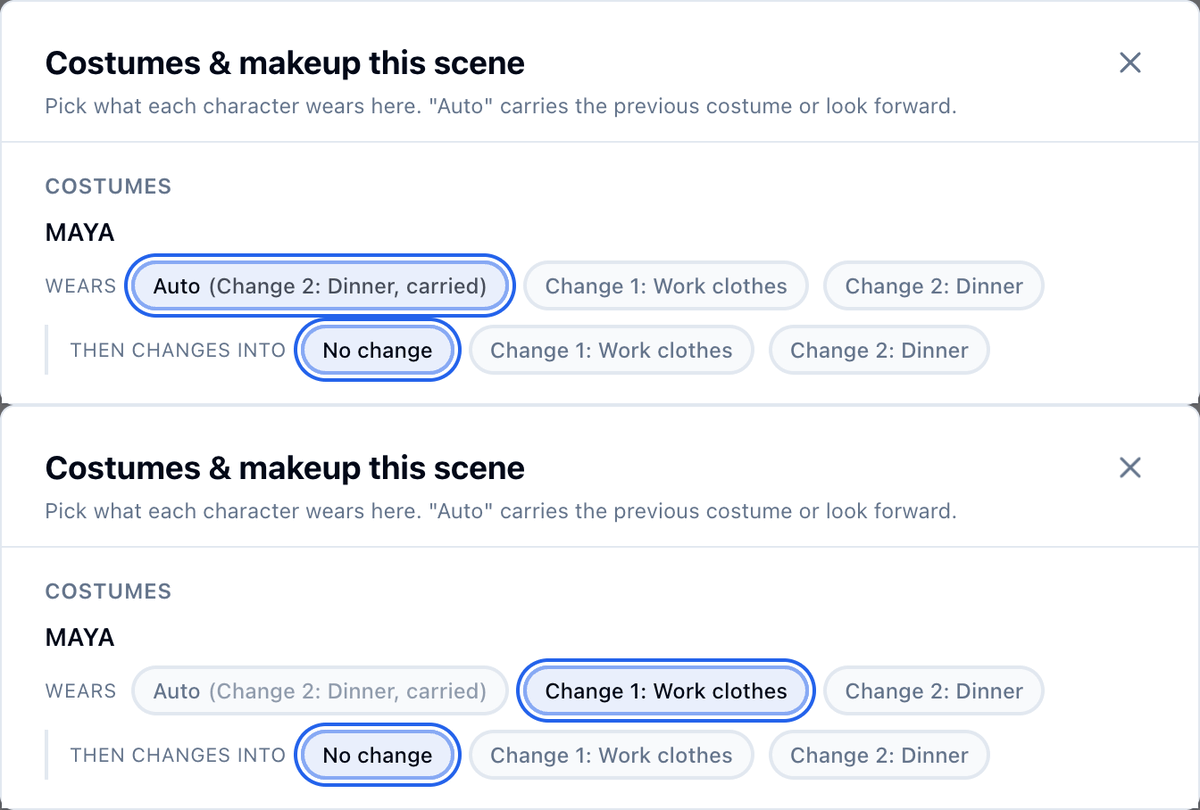
In the last scene, Auto shows Dinner carrying in; clicking Change 1: Work clothes puts Maya back in her work clothes Auto carries in whatever the character wore in the scene before. When garments are tagged in the scene itself, the scene uses that costume, and Wears becomes Starts in. See the next section.

Change costume partway through a scene

A character can walk into a scene in one costume and leave in another. The costume they end in carries into the next scenes. When the new costume is tagged in this scene:
  1. Tag the new costume’s garments in the scene and put them in a new change, like “Dinner”.
  2. In the sidebar, click Manage costumes & makeup this scene.
  3. Under the character, next to Starts in, click the costume they walk in wearing.
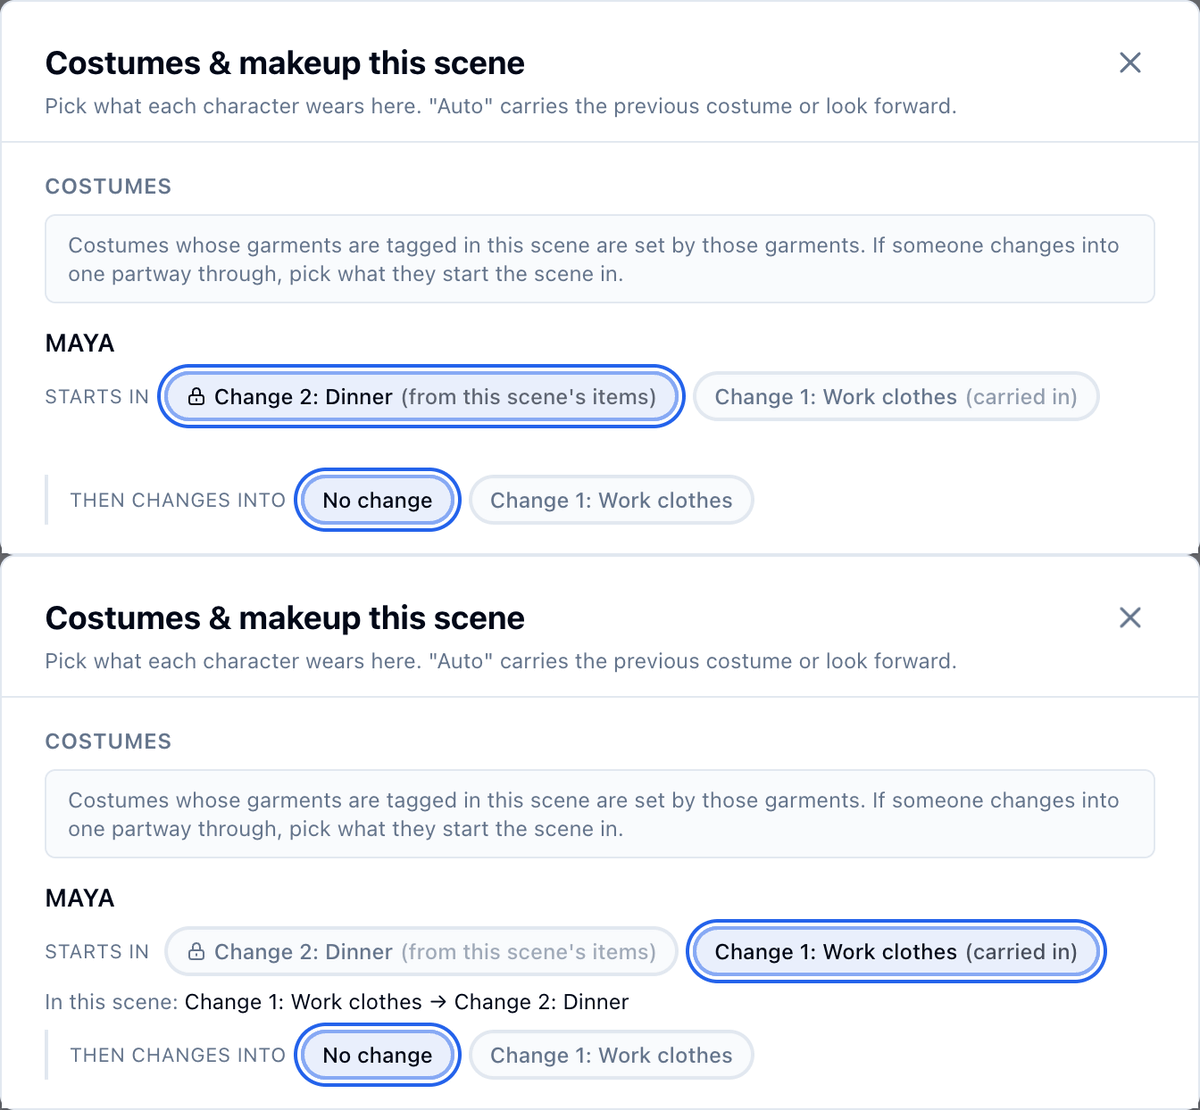
Scene 3 starts in Change 2: Dinner from the scene's sundress; clicking Change 1: Work clothes (carried in) makes the scene read Change 1: Work clothes → Change 2: Dinner The costume they carried in from the scene before is marked (carried in). If you don’t pick one, they arrive already wearing the new costume. When they change into a costume from an earlier scene:
  1. In the sidebar, click Manage costumes & makeup this scene.
  2. Under the character, next to Then changes into, click the costume they change into.
Only costumes the character already has are listed. Below the character, In this scene shows the whole sequence, like Change 1: Work clothes → Change 2: Dinner. The costume continuity sheet prints it the same way.

Example: Maya changes for dinner

Maya works the bait shop and the dock in her work clothes in scenes 1 and 2. In scene 3 she gets home and steps out in a green sundress.
  1. In scene 3, tag sundress and put it in a new change, “Dinner”.
  2. Open Manage costumes & makeup this scene.
  3. Next to Starts in, click Change 1: Work clothes (carried in).
Scene 3 now reads Change 1: Work clothes → Change 2: Dinner, and scene 4 carries in Dinner.

Example: a flashback or a daydream

Flashbacks and daydreams put a character in a different costume, then return them to their main one. Mark the costume so it never carries forward:
  1. Tag the flashback costume’s garments in its scene and put them in their own change, like “Prom dress”.
  2. On one of those garments’ boards, in the Costume change row, tick Flashback or daydream next to the change.

Ticking Flashback or daydream next to Change 2: Prom dress on the prom dress's board, which tags the change flashback The change shows flashback on its pill. The scene after the flashback goes back to whatever the character wore before it, with nothing to set. The scene after Maya's prom flashback: Auto carries Change 1: Work clothes and Look 1: Work braid back in, and the prom dress and Teenage Maya are marked (flashback) When the daydream happens inside a scene, also pick what the character starts in:
  1. Open Manage costumes & makeup this scene.
  2. Next to Starts in, click the main costume.
The scene reads Main → Daydream, and the next scene carries in Main. To show the return on the continuity sheet too, click the main costume next to Then changes into.

See all of a character’s costumes

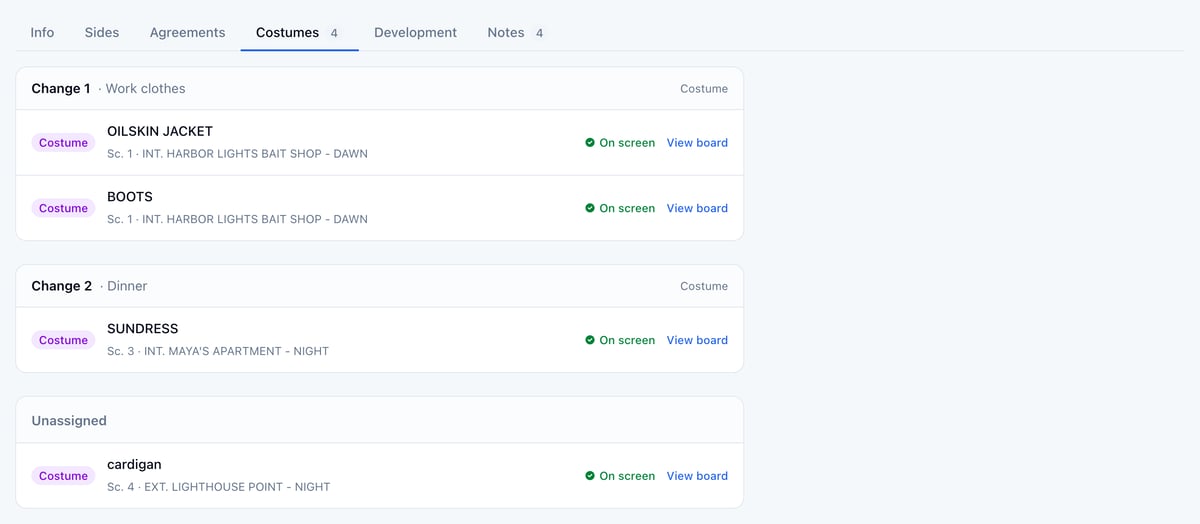
On the character’s board, click the Costumes tab. Their garments are grouped by change, with the ones not in a change under Unassigned. Click View board to open any of them. Maya's Costumes tab: Change 1 Work clothes with the oilskin jacket and boots, Change 2 Dinner with the sundress, and the cardigan unassigned
Add a Specifications card

  1. On the garment’s board, click Add Card.
  2. Click Specifications, then Continue.
  3. Click + Add field… and pick a field, like Size.
  4. Type its value.
  5. Repeat for each field you want, then click Create Card.
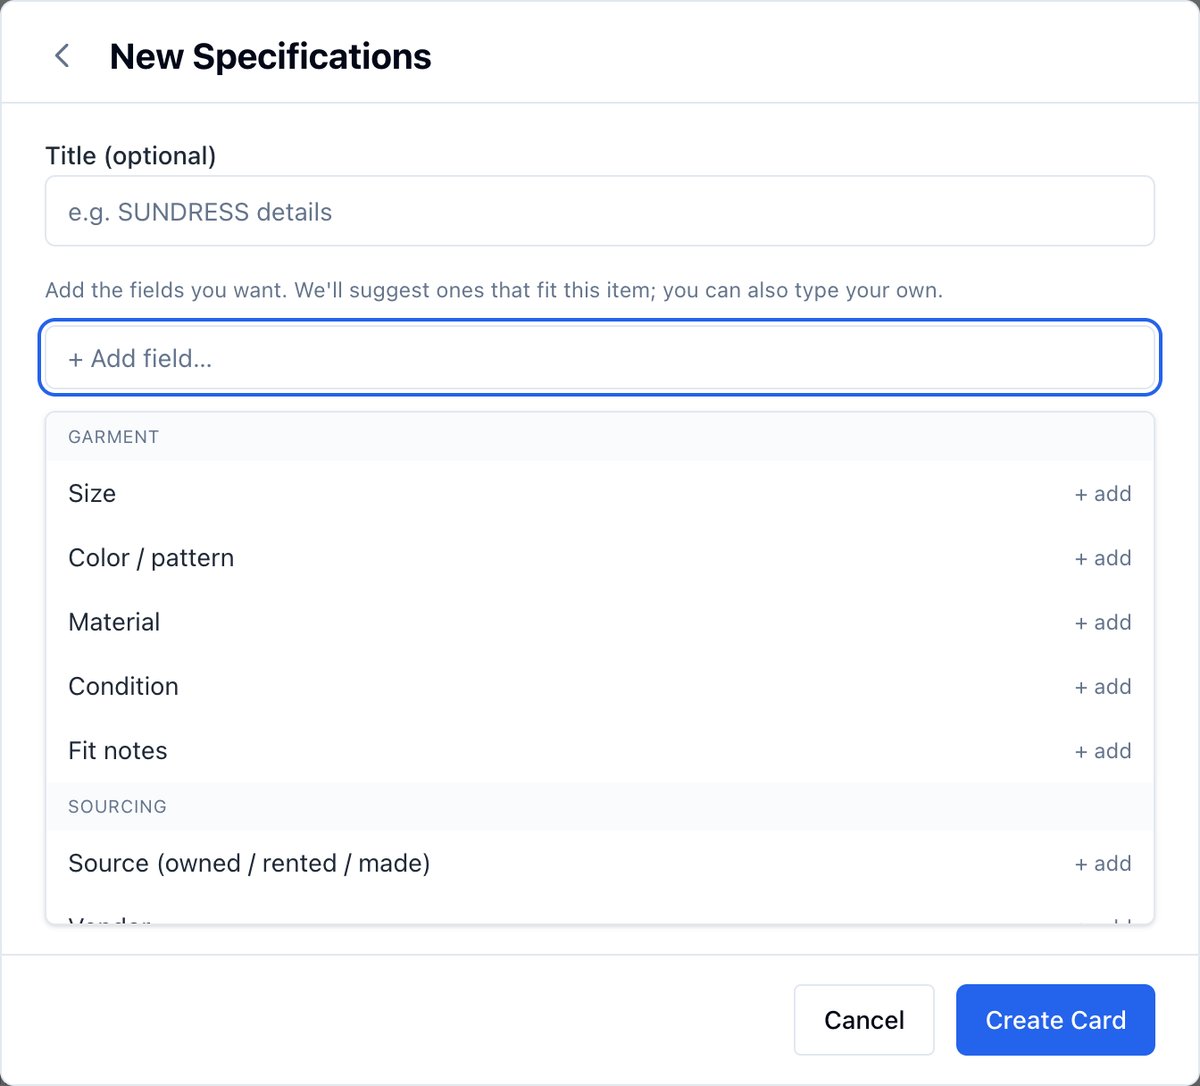
For a costume, + Add field… suggests garment fields (Size, Color / pattern, Material, Condition, Fit notes), sourcing fields (Source, Vendor, Cost, Pickup date, Return date), and production fields like Duplicates required and Aging / distressing notes. You can also type a field name of your own. The New Specifications form on the sundress's board with the garment fields suggested A garment’s board also takes Note, Link, Image, Todo, Contact, and Moodboard cards, for reference photos, rental house pages, fitting checklists, or the tailor’s contact.

Track what a costume costs

Open the garment’s board and click the Notes tab. On the Cost / Budget card, type the Estimated amount. To list each thing you bought instead, click + Itemize this element and add line items; their total fills Estimated. See Line items and board sync and Budget. The Costume Continuity PDF lists each shoot day’s scenes with what every character is wearing, which change it is, and where it carried from. Garments tagged in a scene but not in a change are listed under Not in a costume change.
  • From Breakdown, open Reports and click Costume Continuity under Schedule.
  • From the schedule, click Export, then Costume Continuity.
  • From a day’s board, click Costume Continuity (Day) for that day only.
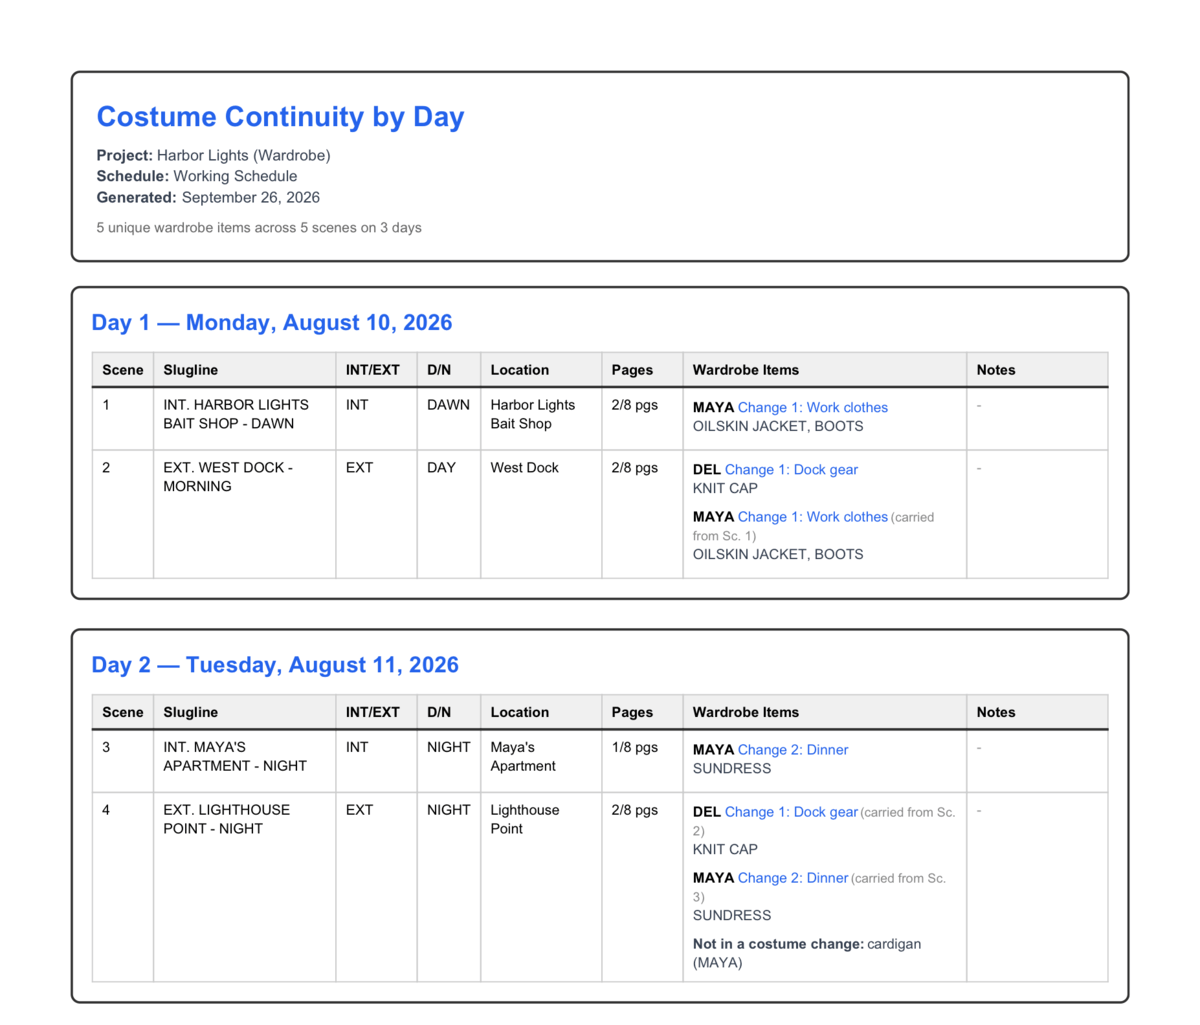
The Costume Continuity PDF: Day 1 with Maya in Change 1 Work clothes, and Day 2 with Maya in Change 2 Dinner carried into the lighthouse scene, with the cardigan listed as not in a costume change

Rename, merge, or move a costume

Renaming a garment, merging two garments tagged under different names, and moving one to another category with Change type work the same way as for props. See Managing props.